Mastering Roof Inspections: Asphalt Composition Shingles, Part 26
by Kenton Shepard and Nick Gromicko, CMI®
The purpose of the series “Mastering Roof Inspections” is to teach home inspectors, as well as insurance and roofing professionals, how to recognize proper and improper conditions while inspecting steep-slope, residential roofs. This series covers roof framing, roofing materials, the attic, and the conditions that affect the roofing materials and components, including wind and hail.
Properly Driven Fasteners
Depth of Penetration
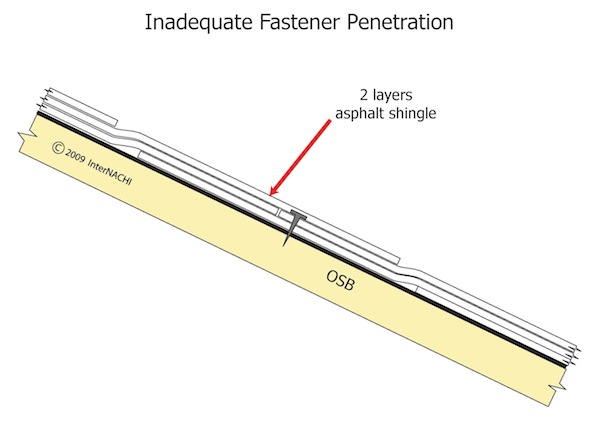
Whatever fasteners are used, they have to be of adequate length. Nails should penetrate a minimum of 3/4-inch (19mm) into the sheathing, or just through the roof sheathing if it’s 1/2-inch plywood or OSB. Some manufacturers allow nails with less penetration above exposed soffits if extra nails are used.
Longer nails are required under certain circumstances, such as:
- when new shingles are installed over existing shingles;
- when thicker shingles, such as high-end, multiple-layer laminated shingles, are used; and
- when fastening hip and ridge cap shingles or ridge vent cap shingles. This is especially true when a continuous ridge vent is installed.
If you see many loose or missing shingles, be sure to check the method of fastening.
Nails and staples have to be driven to the proper depth.
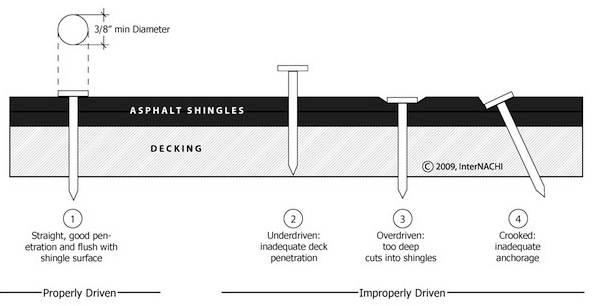
When nails are fastened with an air compressor-powered nail gun, it’s not uncommon for nails to be over-driven. Over-driven nails cut into the shingles, reducing their wind resistance. Nails driven at an angle cause the same problem. Under-driven nails protrude and, over time, will wear a hole in the overlying shingle.
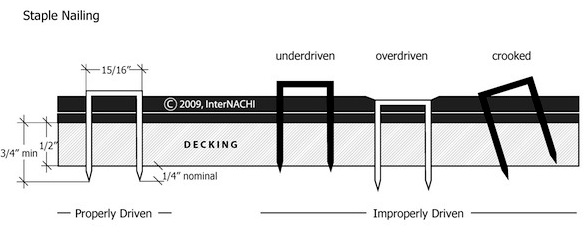
The same is true of staples. Over-driving, under-driving, and driving staples at an angle can be even more of a problem than with nails due to the shape of the staple crown. Again, with staples, proper crown orientation is crucial to maintaining wind resistance. Staples should be installed with the crowns parallel to the long edges of the shingles.
Fastener Placement
Fastener placement is specified by manufacturers, and it’s often similar for similar types of shingles.
Conventional Pattern

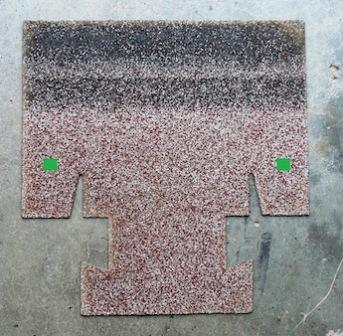
The green areas on this 3-tab shingle show the typical nail placement on homes in areas with normal wind conditions.
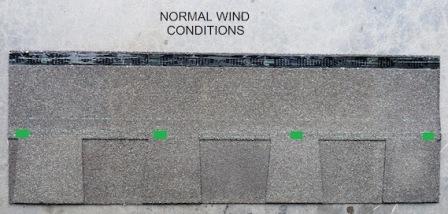
Typical 3-tab and laminate shingle installations require a total of four nails spaced evenly across the shingle.
Other types of shingles, such as this heavy laminate, have similar requirements for normal wind.
T-locks have different fastener placement requirements.
High Wind Pattern
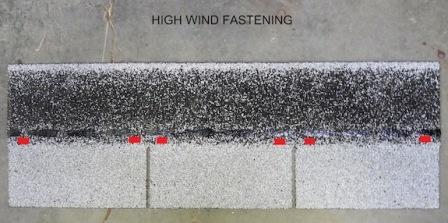
Some areas are designated as “high wind” by the local AHJ. Strip shingles in high-wind areas typically require a total of six nails. The high-wind schedule requires placing two nails instead of one at each of the inner positions. These nails should be 2 to 3 inches apart. The red areas here show nail placement for high-wind conditions.
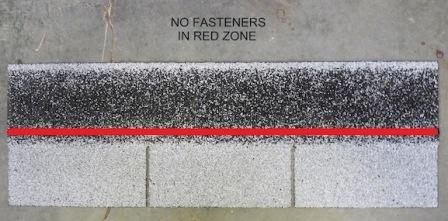
Some rules apply to almost all shingles. Placing nails in the adhesive strip can cause the shingles to fail to seal properly, reducing their wind resistance.
Placing fasteners above the adhesive strip, called “high-nailing,” will also reduce the shingle’s wind resistance.
On strip shingles, fastener placement should be limited to areas within the green strip.

High-nailing is common, and you should remember that, even though you’ll see it often, high-nailing is improper installation and should be described that way in the report. Correction involves placing nails in the proper locations and hand-sealing the affected shingles because, once the adhesive strips have been broken loose, they may not re-seal themselves adequately. If shingles are old and brittle, it may be impossible to re-fasten them without damaging them.

These heavy, laminated shingles have different fastening requirements. This is the recommended fastening for roofs with pitches less than 21:12.

For pitches greater than 21:12, the manufacturer requires additional nails within 1½ inches of the top of the shingle. You won’t see them unless you’re watching the roof being installed.
**************************************************
Learn how to master a roof inspection from beginning to end by reading the entire InterNACHI series: Mastering Roof Inspections.

Take InterNACHI’s free, online Roofing Inspection Course
Mastering Roof Inspections
Roofing Underlayment Types
Inspecting Underlayment on Roofs
Fall-Arrest Systems
Roofing (consumer-targeted)
More inspection articles like this