Mastering Roof Inspections: Asphalt Composition Shingles, Part 55
by Kenton Shepard and Nick Gromicko, CMI®
The purpose of the series “Mastering Roof Inspections” is to teach home inspectors, as well as insurance and roofing professionals, how to recognize proper and improper conditions while inspecting steep-slope, residential roofs. This series covers roof framing, roofing materials, the attic, and the conditions that affect the roofing materials and components, including wind and hail.
Individual shingles can usually be replaced by breaking or cutting their adhesive-strip bonds. Once the fasteners are removed, the damaged shingle can be replaced with one that matches, and then hand-sealed.
Removing a damaged shingle without damaging the surrounding shingles may be impossible on older roofs with brittle shingles. If this appears to be the case, be sure to include this information in your report to the homeowner.
It’s also sometimes possible to perform spot repairs. For instance, if granules are missing in a few places from something such as a blister pop, it’s possible to add roof mastic and sprinkle on granules, but this type of repair is not common.
Performing the Inspection
The asphalt shingle inspection actually starts on the ground. Walk the home's perimeter, and look in the yard for shingles or parts of shingles that have come off the roof. If you find any, it's likely that they’ve been blown off. But, occasionally, they can find other ways of making it down to the ground.
If you find shingles on the ground, you should watch for missing shingles on the roof and check to see which components failed, why they failed, and the extent of the failure. Is the damage limited to a few shingles? Have shingles on the whole roof failed in the same manner? Or, is the failure limited to certain areas?
You can sometimes tell by looking at shingles you find on the ground what you’re likely to find on the roof. For example, if you look closely at this shingle (pictured below), you can see that it was fastened with staples. The missing sections along the top are where this shingle tore loose from the staples that fastened the shingle in the course above.

If you look closely, you can see the marks left by the staples that held this shingle in place. The crowns of the staples should have been parallel to the length of the shingle but, as you can see, the installer rotated the staple gun as he fired, installing the staples at both ends at an improper angle. Once you climb onto the roof, you can expect to find shingles that were fastened with poorly installed staples.

You can see that this shingle was fastened with nails that pulled through. The upper hole was made by a nail that was hidden by the shingle in the course above.
The lower hole was made by a nail that was added after the roofing was installed and would have been visible. This is often a sign that the shingles are poorly bonded and needed additional fasteners to avoid losing shingles to blow-off. In this case, you’d want to be diligent in checking shingle bonding on the various roof slopes.
On the Roof
Once you’re on the roof, walk each slope. You should start at the bottom and work your way up the roof, just to make sure that what you find hasn’t been caused by you. This is a possibility on older roofs with fragile shingles, and on new roofs with shingles which haven’t really had time to cure. Newly installed shingles can still be soft enough to damage easily, especially on hot days.
Checking Shingle Bonding
As you work, tug lightly at shingles in different areas to check the quality of the adhesive-strip bonding. Be sure to check areas subject to greater uplift, such as corners, rakes, just above the eaves, and on the downwind side of the ridge.
If bonding is marginal, you don’t want to break the bond and give the wind the chance it’s been waiting for to start stripping shingles off the roof.
Pay attention to shingles that may have been shaded. They may be on a slope facing a direction that gets very little sun, or parts of the roof may be shaded by trees or mountain ridges, or other parts of the roof.
Also, pay attention to slopes that face the direction from which the prevailing winds blow. These slopes are the most likely areas to have suffered contamination from debris.
Shingle Fastening
If you find tabs that lift easily, mention that in your report. Tabs that lift easily are not a good thing, but this will allow you to be able to see the fastener type and placement.
It’s a good idea to avoid breaking any adhesive bonds at all. But if you do, mark those shingles with chalk and, before you leave, hand-seal them using a caulking gun and roof cement.
If you find areas with missing shingles, pay attention to the fastener installation. If it’s incorrect, the problem may not be limited to that area.
If you find shingles on the ground, you can reconstruct the failure, assuming it was wind-related. This may help you to determine the potential for further damage.
3. When shingle tabs bend or flex excessively, the adhesive strip of the shingles in the course above or to the sides may be affected. Check the shingles near the damaged areas to determine the full extent of the damage.
Shingle Problems
Continue to walk each slope until you’ve covered the entire roof. In addition to shingle bond and fastening, you should check for any problems related to the shingles' manufacture, installation, appearance and design, and damage or deterioration from environmental or mechanical sources.

You can document the roof pitch accurately by checking it with a roof gauge.
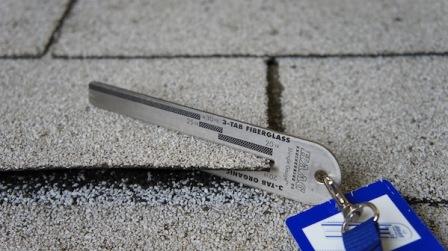
Using a shingle gauge to check shingle thickness will give you a good idea of the length of the warranty. Make sure that your client knows that you are not confirming the warranty or offering a warranty.
Check to see how many layers are installed, and note in your report if more than one layer exists. If underlying layers are of a different roof-covering material, that information should also go in your report.

You can record all three conditions in one photo if you use the shingle and pitch gauges at the roof edge. You can also show whether edge metal is installed.
Flashing Problems
Check the roof for the proper installation and the condition of the flashing. You may need to look at the roof edges to see flashing that may be mostly hidden by shingles.
Underlayment Problems
**************************************************
Learn how to master a roof inspection from beginning to end by reading the entire InterNACHI series: Mastering Roof Inspections.

Take InterNACHI’s free, online Roofing Inspection Course
Mastering Roof Inspections
Roofing Underlayment Types
Inspecting Underlayment on Roofs
Fall-Arrest Systems
Roofing (consumer-targeted)
More inspection articles like this