Would you think the same rules that apply to stucco and cultured stone (drainage system with weep screed) should apply to a tile wall? In the photo below, the tile wall buts up to hard-coat stucco.
There was no weep screed in this tile wall. This type of wall cladding is very unusual in this area. (Foundation is a crawl space.)
Not necessarily…depending the size joints and what they use as the sheathing.
shower stalls are used every day and yet when tiled properly do not have a problem with water hitting the surface as long as it is properly caulked / grouted with the drain basin directing the water into the sewer system.
The issue you may face with tile is if expansion joints are necessary (typically every 20 ft)…in the picture you are showing I don’t think that is an issue.
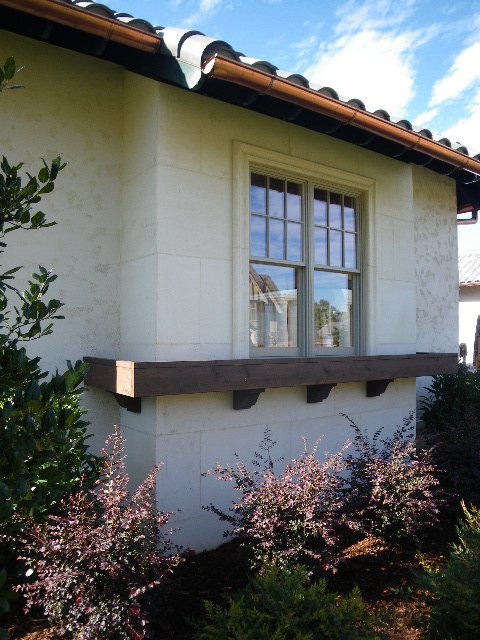
I would be more concerned with out the planter boxes (or whatever they are) are fastened.
Typical installation would be to have a structural sheathing such as OSB or Plywood (I like OSB myself) with NO felt paper or moisture barrier since you need to apply a backerboard *with both thinset and nail/screws.
*Caulk around and windows or doors and then install any flashing details to your backboard; especially around windows and doors.
Installation of the backerboard on top of the OSB/Plywood should consist of BOTH approved thinset and screws / nails (exterior grade). Tape your joints and and apply at least 2 parch coats; roll on or brush with a waterproof sealer. (repeat the parch and waterproof coats again is so desired)
Once coats are dry you can now apply your tile using a thinset which can support the size tiles you are using…I typically will use additives to give it better bonding strength to the tile.
Grout, seal and your good to go.
When grouting around windows or doors it is best to use a sanded caulk of the same color your grout selection is…simply grouting up againts a door or window will result in cracking which depending on the wx can be problematic during freeze / thaw cycle; even though it will not result in moisture penetration it will be aesthetically unpleasing…best to use a sanded caulk to match your grout.
As to the planter boxes, you can simply use self sealing joint tape where you screw same into the studs… and you do need to hit studs…not simply rely on hitting the plywood/osb. caulk over your screws and your good to go. (your basically insuring no moisture is going to penetrate any holes that have been drilled).
If I were to put the planter boxes on, then I would have elected to apply additional parch coats (probably 4- 6) and at least 2 waterproof coats between each set. The planter boxes should have metal / plastic tray inset as well as a drainage system. Rarely do you find that though…
Hope that makes sense…
Jeff
PS. You can see that you may simply have to state that these type of exterior veneers require attention to detail during installation for which you as an inspector can not account for; monitor periodically to ensure no moisture penetration into the building envelope.
Different type of systems…
A shower wall does not have a drainage system per se but rather the way it is built prevents moisture from penetrating to the studs or into the wall cavity.
There are techniques that should be used to tie the walls and shower basin together to ensure that water penetration does not occur but then again these are techniques are seldom done by installers (which is why I will let a custom shower run sometimes as long as 30 minutes…9 times out of 10 they will fail because they were not done right… many of our trades have become so compartmentalized that installers have lost valueable knowledge along the way).
Some stucco systems, including real stucco, does not have a drainage system pe se but like tile is designed to keep moisture from penetrating into the wall cavity.
When stucco fails, it is often because of improper flashing techniques around windows, doors, and other protrusions… other times the various coats were not properly mixed or applied during adequate temperatures or at times not thoroughly dried.
When installing tile to an exterior wall, you are building it up and water proofing it at the same time which is different then a system which allows for moisture to get behind the product.
Lets take brick for example; brick requires a 1 inch gap (which I have never seen in 30 years…its more like 1/2 inch) between the veneer and the wall structure itself.
The wall sheathing should have a moisture proof barrier, such a 30# felt, to prevent the moisture from entering into the building envelope. The felt paper then directs any moisture on a flashing material which is suppose to be tucked behind the felt paper (seldom happens) which is then directed out to weep holes. That is a true drainage system…again, real stucco and tile is designed so that the moisture does not build up or enter to the structural sheathing in the first place.
The proper way to do a shower wall is to apply 30# felt onto the framing members themselves and then apply the cement backer board (green / purple / yellow drywall is a joke… as is hardiboard…both will fail) on top of the felt by screwing (best) or nailing followed by taping joints and then doing your thinset and tile work. Tile has been done this way for thousands of years… and when done properly it will last hundreds of years if not more…and with showers, they get more moisture than your average exterior veneers…yet this technique is a proven winner.
The main thing you want to look for is how the flashed and jointed around protrusions (windows, doors, pipes, etc). If they got that right then you should be good to go.