Mastering Roof Inspections: Roof Framing, Part 3
ROOF TRUSSES
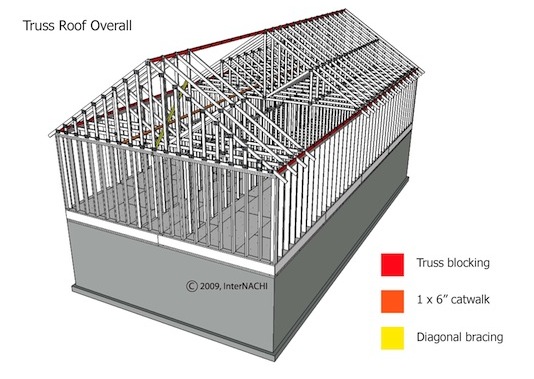
Roof trusses are engineered roof framing systems in which the main components -- roof trusses -- are designed by structural engineers, then assembled in a manufacturing facility before being delivered to the job site by truck.
Let’s take a look at how trusses are built.

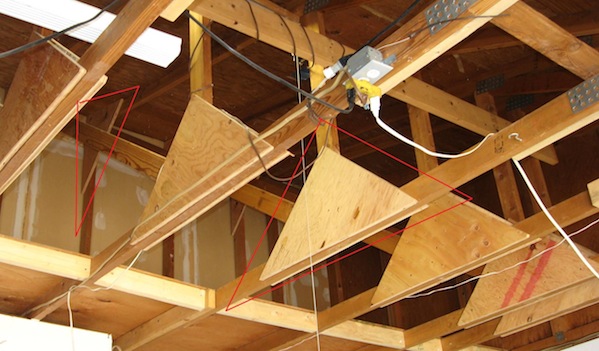
Trusses are manufactured in a wide variety of configurations and have been around since the early 1950s. Trusses have to be engineered correctly, so if you see trusses fastened together with plywood gussets instead of rings or gangnails...


… you’re looking at a non-professional design, and you should recommend evaluation by a structural engineer.

In this photo of the same home, you can see that roof leakage has caused wood decay of the plywood gusset. By the time decay becomes visible, wood may have lost up to 50% of its strength, so decay is one more reason to recommend evaluation by a structural engineer.
Most roof trusses are designed to bear on the exterior walls only. Trusses touching interior walls can transfer roof loads to walls not designed to carry a structural load.
Trusses touching interior walls can also create point loads on trusses at points not designed to support point loads. In rare cases, this has resulted in “exploding trusses.”

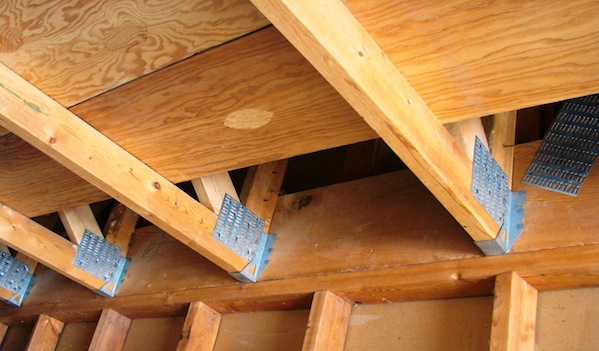
As you can see in the image above, the bottom chords of trusses should be fastened to the tops of interior, non-bearing walls with slotted clips which allow for some vertical movement of the trusses. Movement is usually related to changes in the moisture content of the wood trusses. This can be a response to changes in relative humidity or other conditions which cause moisture level fluctuations in attic spaces.
Truss movement can also result when roof loads exceed the structural design loads of the trusses, as might happen with the accumulation of lots of wet, heavy snow in an area that seldom gets snow.

Trusses are usually braced with a system of 2x4s and 1x6s when they’re installed. The locations of bracing can be different for different truss designs, and you’ll have no way of knowing what the requirements are. Trusses are often installed with blocks at the roof peak and above the outside walls, but these are not always required. So, in your report, don’t call missing blocks or bracing a defective condition.
Look for signs of failure.
Trusses out of plumb are poor-quality construction but may be stable. If they’re badly out of plumb, mention that in your inspection report. Look for broken or damaged truss components, and comment on them in your report.
Trusses should never, ever be structurally altered in any way without approval from a structural engineer. If you see trusses which have been cut or reinforced, recommend evaluation by a structural engineer.


Here’s the garage of the house. The neighbor told the inspector that the roof of the garage next door had collapsed during a big snowstorm the previous year.
It's easy to see that the trusses have been altered. Plywood gussets were added at a connection that would typically have had metal gangnails installed.

In the rare instances in which alterations involving plywood gussets have been approved by a structural engineer, gussets usually have backing for perimeter nailing installed, are glued with a special construction adhesive (such as PL Premium), and are heavily nailed, with nails every two or three inches or so. You should see lots of nails and glue squeezing out of joints. As you can see in the photo above, that wasn’t the case here.

Looking over to the wall, notice that the hangers seem to be small for the load they're carrying.

The hangers turned out to be sized for a 2x4, which is far too small for the roof load they are carrying. They were fastened with a total of four gold deck screws each! The deck screws are a serious defect, rated far below acceptable hanger nail strength.
In addition to that, they were installed through drywall, which does not support the shaft of a fastener the way wood does.

**************************************************
