Mastering Roof Inspections: Slate Roofs, Part 8
by Kenton Shepard and Nick Gromicko, CMI®
The purpose of the series “Mastering Roof Inspections” is to teach home inspectors, as well as insurance and roofing professionals, how to recognize proper and improper conditions while inspecting steep-slope, residential roofs. This series covers roof framing, roofing materials, the attic, and the conditions that affect the roofing materials and components, including wind and hail.
Hips

Capped hips -- also called saddle hips -- are similar to cap shingles on a wood roof. Two slates form a cap that extends out over the field slates on each roof slope. Unlike wood cap shingles, cap slates don’t fasten to each other but to nailers fastened to the sheathing along each side of the hip.
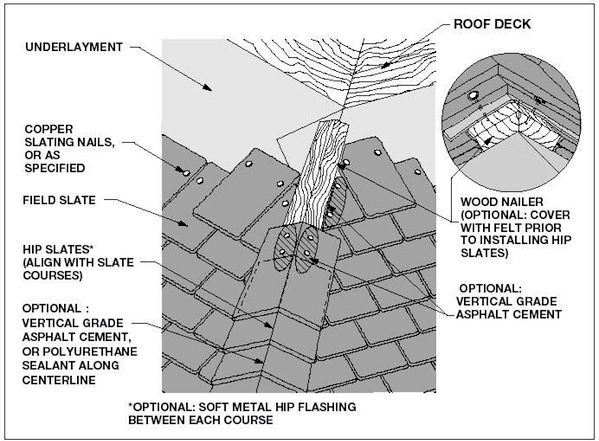
Capped hips should have a waterproof-base membrane installed over the nailers. As cap slates are installed, they sometimes have step-flashing installed between each course. Sometimes, the waterproof membrane is used as step-flashing. Cap slates are not mitered where they meet at the center of the hip, and this seam may be caulked or left as is.

You can see in this photo of a mitered hip that a hip slate has been replaced and is held in place by a cleat bent up around the butt. It wasn’t done well, and wind-driven rain may be able to penetrate the roof at this point.

In both methods, two horizontal nailers are fastened to sheathing on each side of the peak. The lower nailer provides nailing for the last course of field slates, and the upper nailer provides backing for the ridge cap slates. The illustration shows a single, wide nailer on each side of the ridge.
Saddle Ridge
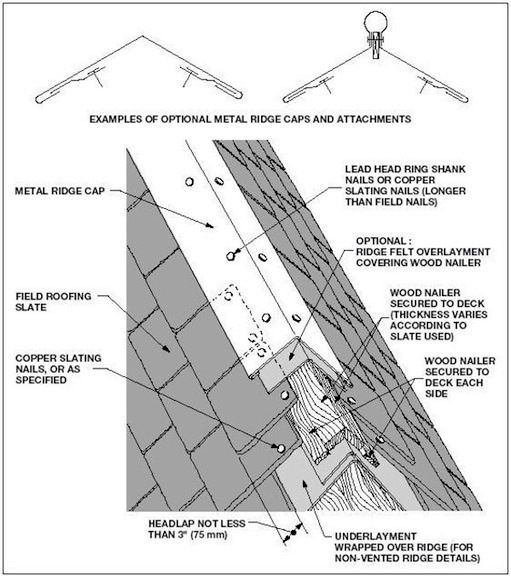
The saddle-ridge method uses cap slates that overlap each other and look similar to asphalt shingle ridge caps. This is the most common ridge detail.
Strip Ridge

The strip-ridge method looks as though field slates continue on to meet at the ridge, and resembles a mitered hip. The photo below shows what it looks like installed on the roof.

Flashing
High-quality slate typically outlasts its flashing. Flashing is almost always the first component to fail on a slate roof. The maximum lifespan for flashing is about 70 years. So, when you inspect homes approaching this age or older, look at the general condition of the flashing, especially if you see temporary repairs, such as mastic or caulk. If 25% or more of the slate would be disturbed by replacing the flashing, it may be more cost-effective to remove and replace the entire roof.
In addition to the hips and valleys, slate roofs need flashing at the usual places, such as penetrations, sidewalls, headwalls, at changes in pitch, and at roof edges.
Combustion and plumbing vents should be flashed so that runoff stays on top of the slate. Sidewalls should be flashed using step-flashing. Modern requirements are 4-inch minimums both up the wall and under the slate, but older homes may not meet modern requirements. If flashing looks like it’s been keeping moisture out of the roof system, then it’s been doing its job.
You’ll often see copper flashing installed with slate. The standard is 16-gauge copper, and it typically lasts about 70 years, although this varies with the local climate.
Copper flashing should be installed using copper fasteners. If galvanized steel fasteners are used with copper flashing, galvanic corrosion will corrode the steel, causing the fasteners to fail prematurely.
Inspection
When you inspect a slate roof, you’ll be doing it through binoculars, from a ladder at the roof's edge, or from a window or balcony. Scan along the hips, valleys, ridges, sidewalls, headwalls and penetrations. Scan sections of field slates for damaged, missing, poorly installed or repaired slates.
**************************************************
Learn how to master a roof inspection from beginning to end by reading the entire InterNACHI series: Mastering Roof Inspections.

Take InterNACHI’s free, online Roofing Inspection Course
Mastering Roof Inspections
Roofing Underlayment Types
Inspecting Underlayment on Roofs
Fall-Arrest Systems
Roofing (consumer-targeted)
More inspection articles like this