Mastering Roof Inspections: Tile Roofs, Part 4
by Kenton Shepard and Nick Gromicko, CMI®
The purpose of the series “Mastering Roof Inspections” is to teach home inspectors, as well as insurance and roofing professionals, how to recognize proper and improper conditions while inspecting steep-slope, residential roofs. This series covers roof framing, roofing materials, the attic, and the conditions that affect the roofing materials and components, including wind and hail.
During an inspection of concrete tile, you should look for the following types of problems:
- installation, including:
- fastening;
- proper exposure; and
- flashing.
- broken, damaged and missing tiles;
- environmental problems, such as biological growth;
- manufacturing problems, such as spalling, voids and shrinkage cracks; and
- excessive weight.
Weight
The weight of concrete tiles may vary from 900 to 2,000 pounds per square, depending on the type and manufacturer. When inspecting homes with concrete tile roofs, look at other homes in the neighborhood. If they look similar to the home you’re inspecting but have lighter roof-covering materials, the roof you’re inspecting may also have originally been a lighter material. If you suspect that this is the case, look for compression cracking in drywall or plaster. You may also want to recommend evaluation by a structural engineer if you suspect that the roof framing may not be adequate to support the increased weight.
Compression cracks are the result of the closure of gaps between vertical framing members due to the added weight of the roof. Compression cracks are vertical or horizontal, following the drywall seams.
The photos below are examples of compression cracking, as opposed to diagonal cracking at door and window openings, which are often the result of foundation movement.


Walking Concrete Tile
The resistance of concrete tile to breakage from footfall depends on the tile profile, quality, and fastening method. They’re brittle and may break easily if you step on the wrong portion of the tile. When you inspect flat tiles with lugs hung on battens, step on the lower 3 inches of the tiles. This way, you’ll be stepping on the overlap, which is the part with the best underlying support. Avoid stepping on the edges of interlocking tiles because they are the most fragile.
Anytime you walk on concrete tile, you risk breaking it, so you may not want to walk the roof. You may instead inspect it from a ladder at the roof edge, from windows and balconies, and from the ground through binoculars. If you don’t walk the roof, you should mention that in your report and either disclaim the roof, or, at a minimum, disclaim the portions of the roof you can’t see. If there are significant portions of the roof that you are unable to inspect, you may want to recommend evaluation by a qualified roofing contractor.
Problems with Interlocking Edges
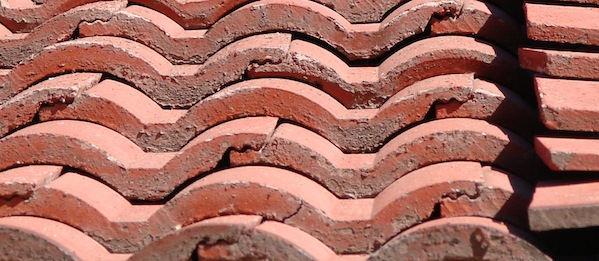
Concrete tiles often have left and right interlocking edges. In order to create the interlocking section, the edges are cast thinner than the rest of the tile. Because they’re thinner, these sections are fragile and are likely to break first when the tile is stressed. Looking up from below, as in the photo above, the left side is typically lapped over and supports the edge of the adjacent tile, while the right side overlaps the adjacent tile. If the edge on the left side cracks, it will be hidden by the overlapping edge of the next tile to the left. If the right side of the tile cracks, that crack will show, since the right-side overlap remains visible.

If you see a tile roof with cracked right corners, this is typically the reason. The source of stress may be footfall from people walking on the roof, or it may be due to expansion. Concrete tiles expand as they warm. If they’re installed tightly together on a cool day, as they warm in the sun, they may expand enough to crack at the overlaps.
Interlocking concrete tiles are moisture-resistant only. Be sure to note the areas with interlocking edges that don’t fit together well, such as those in the photo above.
Missing or Loose Tiles
Missing tiles are relatively easy to spot. Tiles may be lost due to breakage or fastener failure.
Loose tiles may be misaligned, displaced, or raised at one end. The most common areas of the roof to find missing or loose tiles are along the ridges, hips and rakes.
Fastener Failure
Tiles may be lost or loose due to poor fastener installation practices, such as:
- too few fasteners;
- fasteners that are too short;
- the wrong type of fasteners;
- poorly installed fasteners; and
- corrosion that accompanies aging.
If you find fastener problems in one area, check a number of representative areas across the roof to determine whether the problem is widespread. You may be able to lift tiles to see fasteners. You can try slightly pushing tiles upward toward the ridge. If they refuse to move, the fasteners are holding. Don’t force them.
It may be impossible to see the fasteners, depending on what system has been used.
End of Useful Life
**************************************************
Learn how to master a roof inspection from beginning to end by reading the entire InterNACHI series: Mastering Roof Inspections.

Take InterNACHI’s free, online Roofing Inspection Course
Mastering Roof Inspections
Roofing Underlayment Types
Inspecting Underlayment on Roofs
Fall-Arrest Systems
Roofing (consumer-targeted)
More inspection articles like this