Inspecting Roof Panel Sheathing
by Nick Gromicko, CMI® and Ben Gromicko
This article covers some tips and details for home inspectors to keep in mind when inspecting the lumber roof sheathing and the general structure of the roof. Be sure to check with your local building code requirements and manufacturer recommendations related to roof sheathing.
Lumber roof sheathing and lumber roof panels are terms used in the International Residential Code that refer to panels manufactured with fully waterproof adhesive. They include plywood, oriented stand board (OSB), and composite panels made up of a combination of wood veneers and reconstructed wood layers. Plywood panels are manufactured by gluing together three or more cross-laminated wood layers. OSB panels are made from multiple layers of wood flakes oriented 90 degrees to each other. Sheathing provides the base for attaching the roof covering and adds strength to the framed structure.

Thickness
The minimum thickness of lumber roof sheathing should conform to Table 1 below.
Table 1. Minimum Lumber Roof Sheathing Thickness | |
Minimum Net Thickness | Rafter or Beam Spacing |
5/8-inch | 24 inches |
1-1/2 inch tongue-and-groove | 48 inches |
60 inches | |
72 inches | |
You may be able to measure the thickness of the roof decking material with a simple ruler, as seen in the photo below taken during an actual inspection.

Allowable Spans for Wood Structural Panels for Roof Sheathing
The maximum span for roof sheathing is limited by the stresses and deflections caused by the design loads. The inspection agencies include a span rating label on the panels, which indicates the maximum spans for that panel.
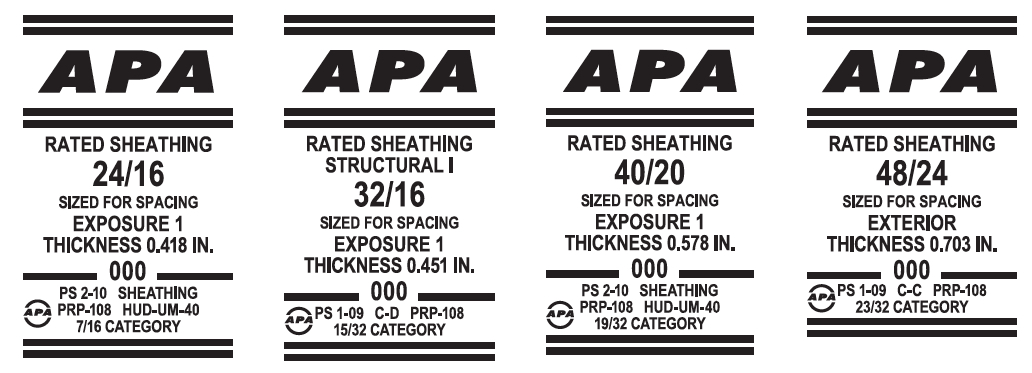
The labels above are common APA rating labels for roof sheathing.
The rating appears as two numbers. The first number is the maximum span for roof sheathing, assuming that the panels are installed with the long dimension across three or more supports, with the edges supported. The second number is the maximum span when the panel is used for floor sheathing. The label on the far left is a common rating label for sheathing installed on roof trusses spaced 24 inches on center, which is widely recognized as an economical construction method for residential roofs.
Rafters
Rafters should be straight and in alignment during the installation of sheathing. This will help keep everything square and aligned while the sheathing panels are laid down and fastened. It is common for framing supports, such as roof trusses, to be spaced 24 inches on center.
Blocking can help correct areas with twisted framing, as well as provide surface for the panels.
Panels
Plywood panels should be laid with the face grain perpendicular to the rafter boards. The panels should be installed over two or more spans, with the long dimension or strength axis oriented across the rafter boards or truss cords.
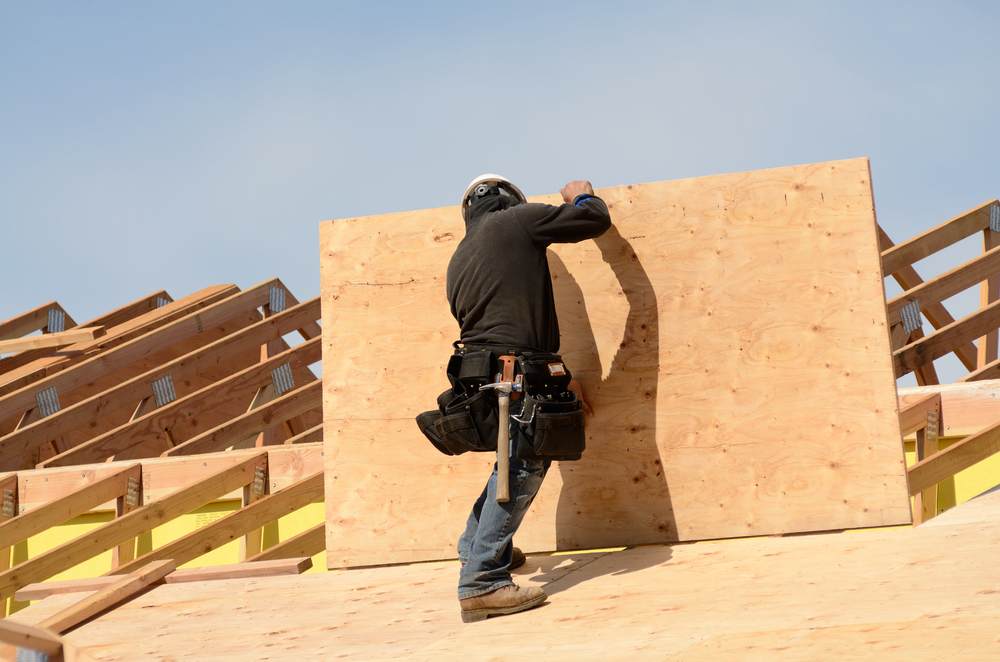
In the above image, the contractor is laying down the plywood panel with the face grain perpendicular to the trusses. Staggering panels by at least two supports is recommended.
During the installation of OSB, the rough surface side should be facing up. This rough side is a screened or skid-resistant coated side.
Panel Ends
The panels should be spaced 1/8-inch apart at the ends and edges.
Fastening
Wood structural panels should be attached to the framing in accordance with the following table.
Fastening Wood Structural Panels to Framing | |||
Panel Thickness | Fastener Type | Fastener Spacing on Edges | Fastener Spacing at Intermediate Supports |
3/8-inch to 1/2-inch | 8 d common nail (2-1/2 inches) | 6 inches apart | 12 inches apart |
19/32-inch to 1 inch | 8 d common nail (2-1/2 inches) | 6 inches apart | 12 inches apart |
For common installations, the panels are fastened with 8 d common or deformed shank
nails. Fastening schedules have certain requirements for high-wind zone
locations and where the roof is specially engineered.
For common installations, fasteners are spaced on the edges 6 inches apart, and 12 inches apart along the supports. There should be at least 3/8-inch of space between the fastener and the panel edge.
In areas where the wind speed is greater than 130 mph, nails for attaching the roof sheathing to intermediate supports should be spaced 6 inches on center for at least the first 48 inches from the ridges, eaves, and gable end walls. The fasteners should be spaced only 4 inches apart on the panel edge at the gable end wall framing.
Fasteners should be driven flush with the panel surface.
Summary
These tips are useful for home inspectors who perform New Construction Inspections, as well as for inspecting homes that undergo roof repair or replacement due to age or heavy weather events.
For further information, visit the APA - Engineered Wood Association's website at www.apawood.org.

Take InterNACHI's free, online How to Perform Roof Inspections course.
Take InterNACHI's free, online General Roof Inspection Training video course.
Take InterNACHI's free, online Wind & Hail Roof Inspection and Replacement video course.
Read InterNACHI's Mastering Roof Inspections article series.