Inspecting Swinging Fire Doors
by Nick Gromicko, CMI® and Katie McBride
According to InterNACHI's Home Inspection Standards of Practice, it is not required for an inspector to inspect fire doors or screens, however, it is strongly recommended that inspectors familiarize themselves with the following key facts and practices of an inspection of swinging fire door assemblies to further improve their inspection knowledge and abilities. Fire door assemblies serve two main purposes in regard to the safety of the occupants. Firstly, fire door assemblies provide adequate time for occupants to exit the structure safely or to create or find an area to safely wait for assistance to arrive. And secondly, fire door assemblies assist in maintaining the structural integrity of the building or home until firefighters are able to extinguish the fire. Home inspectors can review the following information to further understand how to conduct a proper inspection of a swinging fire door, as well as to properly identify defects that require the assessment of industry-specific professionals.
Fire Exposure
The following information will explain the process of how a fire door assembly reacts during fire exposure. Within the first couple minutes of fire exposure, there is a metal fire door leaf that will expand very quickly on the side of the assembly that is exposed to the fire. The intensity of the heat will cause the door leaf to warp and deform in the direction of the fire. A large amount of force is applied to the hinges and latching hardware when the fire is located on the pull-side of the assembly, so the door leaf must remain latched and closed.
As the fire continues to increase in size and temperature, the door leaf exerts even more stress on the latching hardware and hinges as the door leaf deflects further. Fluid that is located within the hydraulic door closer will soon reach it’s boiling point and start to leak. At this point, the door leaf is closed as the door closer has succeeded. With increasing temperatures, fire exit hardware, levers, and door knobs become inoperable as this design will prevent the accidental release of the latching hardware.
Once firefighters arrive and begin to attempt to extinguish the fire, the latching hardware is exposed to even more stress from the pressure and temperature of the water from the fire hose, as metal expands and contracts very rapidly according to temperature.
Safety Inspections
When conducting an inspection of a swinging fire door, the home inspector must comply with NFPA 80 Standard for Fire Doors and Other Opening Protectives 2016 Edition (Section 5.2.3.2, paragraph 5.2.3.5.1), that states, “Fire door assemblies shall be visually inspected from both sides to assess the overall conduction of the door assembly” and well as paragraph 5.2.3.2 which states, “Before testing, a visual inspection shall be performed to identify any damaged or missing parts that can create a hazard during testing or affect operation or resetting”.
Before conducting a fire door assembly inspection, inspectors can benefit from obtaining and using the following tools suggested by the Door and Security Safety Foundation Field Reference Digest for Inspecting Swinging Fire Doors: small, bright flashlight, digital camera (with flash), telescoping inspection mirror (LED lights present in some models), telescoping magnet, magnifying glass, rulers or measuring tape, door gap gauge(s) (for measuring clearances), number 3 Phillips head screwdriver for checking hinge screws, Number 2 Phillips head screwdriver for checking lock and strike plate fasteners, and standardized forms for recording details of fire door assemblies.
It is important for home inspectors to know that maintenance of fire door assemblies is not required to maintain a “like-new” condition, so long as the natural wear and tear of the fire door does not affect their functionality during a fire. The following list describes the components that should be included in an inspection of a fire door assembly.

Figure 1. InterNACHI® inspector inspecting a fire door.
- Leaf
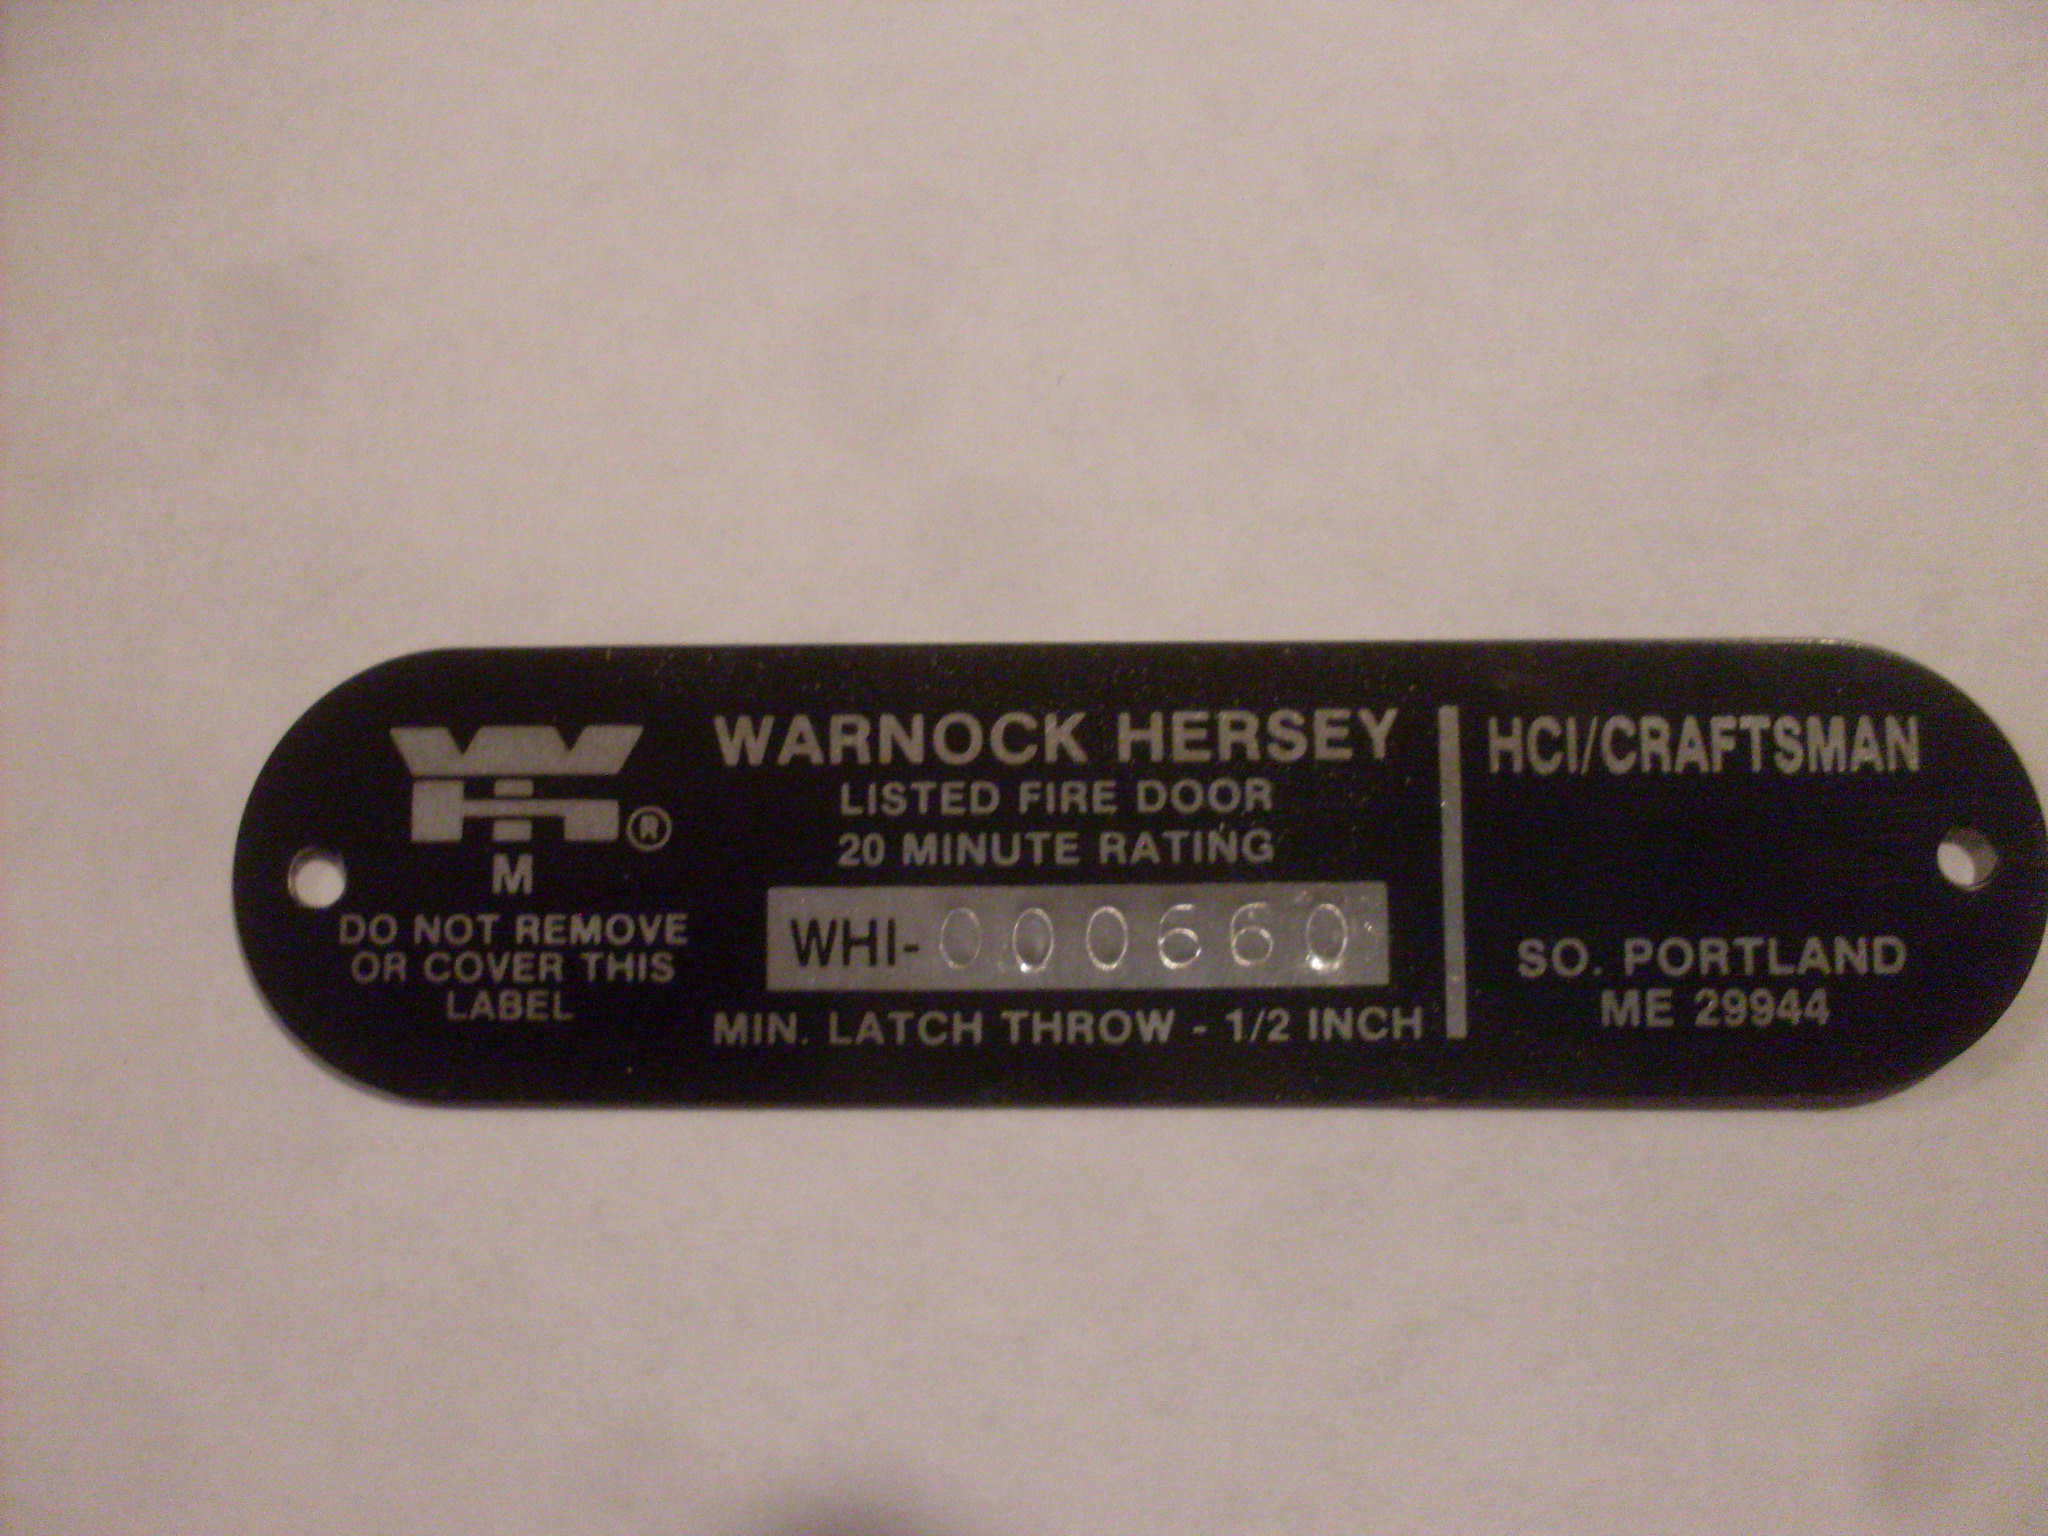
Label on Door
- There should be a label that appears on the edge of the door where the hinges are located. Some leaf labels may appear on the top edge of the door. The label should list information regarding testing organization, manufacturer, hourly fire-protection rating, construction label, serial number, degree of temperature rise, positive pressure fire test, fire exit hardware, and minimum latch throw dimension. The label should also mention whether or not fire exit hardware is required to be installed. If this is the case, it is prohibited for the door to have alternative latching hardware.
- Label on Frame
- There are two different labels that could be present on the frame of the fire door. A physical label, which is usually found under the door rabbet of the frame, or an embossed label, which is usually found on the hinge jamb section on the soffit. This label should list information regarding manufacturer, hourly fire-protection rating, and testing organization. It should be noted that frame labels tend to have smaller amounts of information than leaf labels.
- Pull Side of Frame
- The inspection of the frame on the pull side should begin with verification that the frame has been securely anchored to the wall construction. To do this, an inspector should be alert to: signs of movement in regard to the opening and closing of the door leaves, any bolts and/or screws that aren’t securely fastened (fasteners must not be missing or exposed), whether or not the sill anchors on the drywall slip-on frames have come loose, and the anchored security of sill sections of sidelight frames.
- The inspector should be aware that fire-rating of the frame may have indication of field modifications such as auxiliary hardware items and/or strike preparations, and that hollow metal frames may have indication of rust-through.
- The door should be checked for proper opening and closing of the door that may be hindered by substantial dents.
- From left to right, check the face of the frame. This includes; the possibility of a disconnect amongst the head and side jambs located at the corners of non-welded frames, verification that screws are installed to close the miter joints at the corners of know-down frames, and the presence of open holes caused from the removal of hardware items.
- The face of the side jambs should also be inspected from the top right corner to the floor, as well as the top left corner to the floor.
- On the sidelight/panel frames, inspect for sill and mullion sections by scanning left to right and also inspect the glazing beads by checking to make sure that all glazing beads are present and fastened to the frame in a secure manner and that all fasteners are tightened and present. The glazing materials and panels should also be checked for glazing materials that may be damaged or broken.
- By scanning left to right, the transom light/panel frames should be inspected. The mulllions should be securely attached (non-welded frames). The glazing beads should be inspected in this area as well by checking to make sure that all glazing beads are present and fastened to the frame in a secure manner and that all fasteners are tightened and present. The glazing materials and panels should also be checked for glazing materials that may be damaged or broken.
- Pull Side of Door
- Fasteners of hardware items that may have possibly been removed may cause open holes to form.
- Check for prominent deflections or dents that would hinder proper opening and closing with proper latching.
- Look for noticeable indications of field modifications that can possibly compromise the fire-rating of the door. The modifications can potentially be observed on ventilation louvers or vision lights, auxiliary hardware items, or lock and strike preparations.
- Verify that there are no loose or missing fasteners on the vision light frames, ensuring security.
- Check to make sure that the face of the door is flush (or slightly inset) with the face of the door frame.
- The alignment of the doors in the frame should be checked to make sure that at the latch side of the assembly, the vertical edge of the door is flush (or slightly inset) with the frame on single doors, and that the vertical edges at the meeting stile are flush (or slightly inset) with the face of the frame at the head and flush with each lead at the bottom corners of the doors.
- Overlays and plant ons can cause the face of the door to extend beyond the face of the frame.
- Clearances around the perimeter of the door should be verified. To begin, the inspector should start at the top corner of the hinge side of the assembly and inspect the clearance between the frame on the hinge side and the door. Then, the clearance between the head of the frame and the top corner of the door should be checked. Next, the top corner of the door on the latch side of the assembly should be inspected by checking the clearance between the door and the frame on the side and top edges of the door, as well as the between the head of the frame and the top corner of the door. Lastly, move to the bottom of the door and verify that the clearance between the finished floor material and the bottom edge of the door is no larger than 3/4inch.
- The clearance between meeting stiles of the doors on the pull side should be measured in 3 different places. At the lock height, and at the top and bottom corners of the door.
- Vertical
Edges of Doors
- When inspecting the vertical edges of the door, the first step is to open the door and check the hinge and lock stiles. When inspecting pairs of doors, the active leaf lead should be inspected first. This process should be repeated for the inactive leaf.
- Inspect the door skin/face to check for indication of delamination and other through-hole damage (e.g. metal doors may have rust-through). Open holes from the removal or replacement of fasteners of hardware items may be present, and the security of the fasteners should be verified.
- If the door is rubbing on the frame or opposing door lead, there may be wear signs that indicate a misalignment or clearance issue.
- The following applies to wood fire doors only:
- Vertical edges of wood fire doors should be inspected for indication of field modifications.
- If fasteners are installed without pilot holes, the inspector should check for split stiles.
- Push Side of Frame
- An inspection of the push side of the frame should begin on the push side of the door. From left to right, inspect the face of the frame head looking for space between the side jambs and the head at the corners of non-welded frames. Next, check to make sure that all screws are installed with the intention of closing the miter joints at the corners of know-down frames. Lastly, the removal of hardware items may cause open holes.
- The face of the side jambs should also be inspected from the top left corner to the floor and the top right corner to the floor.
- On the sidelight/panel frames, the sill and mullion should be inspected by scanning left to right and checking the glazing beads and glazing materials/panels.
- Lastly, the transom light/panel frames should be inspected by scanning left to right and confirming that the mullions are securely attached (non-welded frames). The glazing beads and glazing materials/panels should also be inspected.
- Door:
Push Side
- If hardware items or fasteners have been removed or replaced, open holes may be present.
- The door may be hindered from fully opening and closing, as well as properly latching if there are significant dents or deflections.
- Inspect the door skin/face to check for indication of delamination and other through-hole damage.
- Vision light frames should be inspected to confirm security (no missing/loose fasteners).
- The inspector should check to make sure that the frame and door are aligned properly.
- The clearance amongst meeting stiles of paired doors with overlapping astragals must be verified.
- This clearance must be measured on the push side of the assembly at the bottom corners of doors, at the lock height, and at the top corners of doors.
- Hardware
- To ensure that each component of the installed hardware of the door and/or frame is capable of performing its necessary function without compromising its capability of fire protection, it is essential that the inspector be aware of all parts and pieces. To understand and review the function of the hardware, the inspector should look for the label located on each component of the hardware.
- The inspector should verify that fasteners used to attach hardware to frames and doors are made of steel or stainless steel. If incorrect fasteners are used (i.e. self-drilling screws, pop rivets, drywall screws), this could compromise the integrity of the assembly. Lastly, it is important that each hardware component be securely attached. If this is not the case, the inspector should recommend that a professional assess the hardware to determine if it is necessary to replace the hardware to ensure the security of the fasteners.
Examples of Labels

Figure 3. Fire rated garage walk through door label. (Image courtesy of InterNACHI® member Dave Fetty, CMI).

Figure 4. Fire rated attic stair hatch cover label. (Image courtesy of InterNACHI® member Dave Fetty, CMI).

Figure 5. Fire rated plywood attic access hatch. (Image courtesy of InterNACHI member, Dave Fetty, CMI).

Figure 6. Fire rated attic stair hatch cover label. (Image courtesy of InterNACHI® member Dave Fetty, CMI).
Defect Recognition and Report Writing
If any defects are discovered, home inspectors are legally unable to repair the defect themselves but they should thoroughly note the defect(s) on a report and strongly urge the owner to seek assistance from a professional immediately. Failing to properly inspect and test the maintenance and integrity of a fire door assembly, as well as to make recommendations to the owner, can result in serious injury and even death of the occupants inside.
NFPA 80 provides a list of information that is required to be recorded and reported on an inspection report. A thorough summary report will go over the over-all conditions of the fire door assemblies, the total number of assemblies inspected, how many of those assemblies had defects, the nature of the deficiencies (minor to major deficiencies), and the importance of maintenance required for fire door assemblies to remain or achieve good working order. As stated in the Door and Security Safety Foundation Field Reference Digest for Inspecting Swinging Fire Doors, summary reports should include:
- Inspection Date
- Facility Name
- Address
- Name of person(s) performing testing and inspections
- Company name and address of inspecting company
- Signature of inspector of record
- Individual record of each inspected and tested fire door assembly
- Opening identifier and location of each inspected and tested fire door assembly
- Type and description of each inspected and tested fire door assembly
- Verification and visual inspection and function operation
- Listing of deficiencies in accordance with 5.2.3. Section 5.3, and Section 5.4
The Door and Security Safety Foundation Field Reference Digest for Inspecting Swinging Fire Doors also states that a detailed report is required after the conclusion of a visual inspection. This detailed report should include:
- Door number or other unique identifier(s)
- Type of fire door assembly
- Fire-protection rating
- Remarks and/or comments (including documentation of special conditions affecting the assembly
- List if deficiencies
- Recommended corrective actions
Summary
Fire door assemblies are a crucial part in protecting and preventing fire from entering a structure. If the intended routine, based on design, goes as planned the occupants should be able to either evacuate the structure, create a barrier, or find an area of refuge. This will also allow the integrity of the structure to uphold until firefighters are able to arrive and extinguish the fire. The fire door assembly is meant to withstand tremendous amounts of pressure and fluctuation of extreme temperatures. When conducting a fire door inspection, home inspectors should be meticulous in their inspection, note taking, and report writing so that any defects may be assessed and addressed to ensure the safety of the owners and occupants.
This article was sourced from InterNACHI® and the Door Security and Safety Foundation.

Fire Doors: Locations, Types, and Inspection Guidelines for Buildings
Brominated Fire-Retardant Dangers
Attached Garage Fire Containment
Attached Garage Fire Hazards
Fire Safety for the Home
Firestops
Read more inspection article like this.