by Nick Gromicko, CMI®
Infrared (IR) cameras are quickly becoming an indispensable tool for home inspectors. Readin
g the thermal images produced by an infrared camera during an inspection allows for quick and accurate identification of defects that may not always be immediately apparent to the naked eye. Infrared imaging is especially useful when looking for air leaks, including insulation defects, during an energy audit because it allows the inspector to actually view the apparent temperatures in a given area.
By purposely controlling the temperature and air pressure in the interior of a house, air can be forced inside through cracks and holes. Using an infrared camera, the sources of these air leaks can be quickly located and visually documented. Areas of insufficient insulation also become more apparent when viewed through an infrared camera and can be visually documented, as well.
How It Works
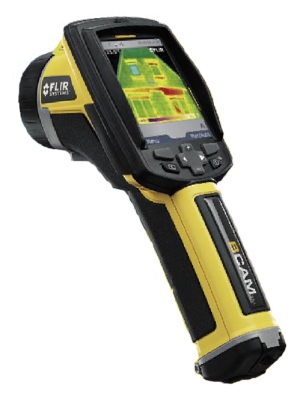
While there are other infrared tools available, such as spot radiometers and thermal line scanners, a thermal imaging camera is the most accurate device to use for energy-audit inspections. The camera reads infrared radiation in order to express heat differences and temperature signatures.
The camera sees light that is within the heat spectrum that exists just beyond the spectrum that can be seen with the naked eye. Differing heat signatures are displayed in the camera's viewfinder as a gradient color scheme, with hotter areas displayed as brighter colors, and cooler areas as darker colors.
An inspector can view this information on the camera in order to make observations and find defects. By viewing the hottest and coldest areas, inspectors can collect valuable data about the building envelope. Images taken with the IR camera can be included alongside digital photos of the same problem area in the inspection report.
Before the Inspection
Equipment should always be checked before the inspection. Make sure batteries are charged on the infrared camera (as well as the laptop, digital camera, and any other equipment that will be used). Find places to charge equipment on site, if possible, in order to avoid any delays associated with dead batteries. If the inspection is likely to take a while, such as for a very large property, it may be a good idea to have extra batteries charging while performing the first part of the inspection. This way, batteries can be switched out if they die while gathering data.
Any digital storage media should also be checked for adequate memory so as not to run out of room while saving images, which are important as the visual documentation of the problem areas. Digital images of problem areas should be saved next to thermal images for comparison, so it is important to have plenty of memory in cameras and on data cards for both types of cameras.
Setting Up for a Thermal Imaging Inspection
Because the IR camera shows differences in heat signatures for a given area, it is important to set up the testing conditions such that the temperature difference between the interior of the house and the air outside is as large as possible. The peaks of the heating and cooling seasons for any region are generally optimal times to gather thermal imaging data, since heat or air conditioning can be run in order to maximize the temperature difference.
All windows and exterior doors should be closed during testing. It is also helpful to move furniture away from walls so that they don't block baseboards, and to remove curtains and blinds (or secure them out of the way) so that accurate readings can be taken at areas typical for leaking air, such as at floor-wall joints and window frames.
Achieving a 15° to 20º difference in temperature is ideal. The heat or air conditioning should then be turned off, and the inspector should wait at least 15 minutes before commencing with the IR inspection.
Insulation Defects
Once a solid difference in temperature has been established between the interior and exterior of the house, insulation defects can be viewed by the camera. By looking at the difference in apparent temperatures, hot and cold spots can be identified as areas that may have missing or inadequate insulation. If a potential problem area is pinpointed using the infrared camera, the insulation in that spot should be examined to verify that it is an issue and to gather more details on the exact nature of the insulation problem. Was insulation moved during a fixture installation and not properly replaced? Is the thickness of the insulation inadequate for the application? These are the types of details inspectors can gather after locating an issue with the insulation.
Finding Air Leaks
Finding the sources of air leaks using thermal imaging requires some additional setup beyond what is needed to find insulation problems. By changing the air pressure of the interior in relation to the exterior, air flow can be increased to force air through cracks and holes. With the warmer or cooler air from the outside flowing into the house through the cracks and holes, inspectors can use thermal imaging to locate the sources of these air leaks.
The best way to pull air inside through cracks and holes is by using blower door equipment. The blower door test creates ideal conditions for pulling air in through leaky spots, and these spots are then visible in the thermal image. If blower door equipment is not available, a house’s exhaust fans and ventilation system can be used to create similar (though less controlled) conditions, allowing useful data to be gathered.
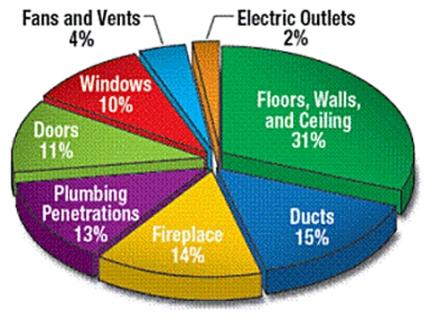
Areas to Check
Knowing what areas to examine for air leaks and insulation issues will speed up the process of finding problems. Infrared equipment is extremely useful for pinpointing the locations of air leaks and specific spots where insulation is inadequate, but it is also useful to know where to start looking for such defects. Air leaks can often be felt with the hand during a blower door test. Also, during cold months, areas of insufficient insulation may be apparent due to the change in temperature in specific spots.
Inspectors can start with the following areas, or any area that is already suspected to be leaking air or lacking inadequate insulation:
- light fixtures;
- electrical receptacles;
- windows and doors;
- attic access;
- attic insulation;
- basement rim joists;
- cellar doors;
- crawlspaces;
- ductwork;
- plumbing penetrations, and traps under tubs and showers;
- plumbing vent pipe penetrations;
- chimney flue and fireplace surrounds;
- dropped soffits;
- dropped ceilings;
- kitchen soffits;
- air handlers;
- cracks between partition top plates and drywall;
- utility chases; and
- baseboards.
By using thermal imaging, inspectors can more quickly identify problems with insulation and the sources of air leaks. Understanding the basics of infrared technology, including how to set up conditions for gathering data, and knowing specific areas to examine, will help inspectors make the best use of thermal imaging cameras during an energy audit.
Consumers should always seek inspectors who are Infrared Certified by looking for the Infrared Certified logo below.