Inspecting Step and Kickout Flashing at Roof-Wall Intersections
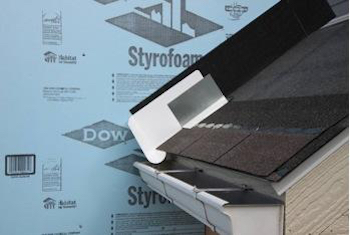
Here's a picture of step flashing being inspected at the InterNACHI® House of Horrors®.
Here's a picture of kickout flashing being installed at the InterNACHI® House of Horrors®.

Flashing Required by IRC
Flashing at wall and roof intersections is required in the International Residential Code (IRC). Please refer to 2021 IRC Section R704.3. The IRC requires that flashing should be installed where there are areas subject to moisture intrusion. Roof and wall intersections create significant challenges for builders and contractors, particularly where the end of a rain gutter intersects with exterior wall covering. This location on the exterior envelope may provide an open route for water or moisture to enter the building.
Kickout Flashing
A kickout flashing is a special type of flashing installed at the edge of a roof where the eaves meet a wall. A common example is where the eaves of a garage roof meet the wall of a two-story home. Another example is where the end of a rain gutter meets the side of a stucco-covered chimney stack. The kickout flashing should extend out from the wall (or side of the chimney stack), protrude away from the siding, and direct roof runoff away from the wall.
Here is a picture of an area where kickout flashing should be installed where the roof and wall intersect, and the roof gutter ends, but it is not.

The term "kickout flashing" has not been used in the IRC (as of 2021). The 2012 IRC, Section R903.2.1, says, "Flashings shall be installed at wall and roof intersections, wherever there is a change in roof slope or direction and around roof openings. A flashing shall be installed to divert the water away from where the eave of a sloped roof intersects a vertical sidewall." Unfortunately, "kickout" is not used in this section, and there is no illustration of the flashing either.
Here is an inspection picture of water stains down a chimney stack below the missing kickout flashing at the area where the gutter end intersects with the stucco exterior wall of the stack.

Deluging rains can pour thousands of gallons of water onto a home’s roof in a single storm. In multi-level house designs where roofs intersect walls, much of this water is channeled along the wall to a gutter. If sidewall flashing is lacking or inadequate, water runoff can get inside the wall and cause serious damage. In big storm events, rainwater can often overflow the gutter and stream down the walls.
Diverters are sometimes fashioned on-site in an attempt to direct this water into the gutters. If undersized, these diverters are not very helpful. If not properly integrated with the existing housewrap and cladding, they can do more harm than good by allowing water inside the wall cavities. The result can be significant damage to wall sheathing, framing, and insulation, as well as mold inside the wall cavities. While older wood siding would show evidence of this water intrusion by peeling paint, new wall claddings, such as fiber cement, vinyl siding, stucco, and brick veneer, can mask the evidence for years.
Here's an inspection picture of a missing kickout flashing at a chimney stack.

Step flashing and kickout flashing work together. Where roof sections intersect with wall sections, step flashing should be used to keep water from entering the walls, and kickout diverters should be used to direct the rainwater into rain gutters where it can be carried away from the structure.
Proper flashing that is correctly integrated with housewrap and cladding along roof-wall intersections, and kickout diverters that are seamless and adequately sized to direct flowing water into the rain gutters are important tools to keep the wall cladding from being saturated by flowing water.
Kickout diverters can be formed on-site from sheet metal, but these are often inadequately sized and have unsealed seams that fail over time.
Here's a picture of a piece of counter flashing improperly being bent on-site to function as a kickout flashing. This is a defect.


Roofers working in coordination with housewrap and siding installers should install the step flashing and kickout diverters.
Although all shingle manufacturers recommend step flashing at sidewalls, some jurisdictions located in areas designated high-wind (like Miami-Dade and Broward Counties in Florida) require sidewall flashing to be continuous because it's more wind-resistant. According to the 2023 Florida Building Code, Section 1507.2.9.1, base and counter flashing must be installed with a continuous metal minimum of 4 inches by 4 inches “L” flashing set against the base of the wall and over the underlayment.
Here is an illustration of a typical step and kickout flashing detail provided by InterNACHI's Inspection Image Gallery.

Inspection Checklist
Home inspectors can look for the following:- Step-flashing should be installed at the sidewalls.
- Headwalls should have fabricated headwall flashing.
- Kickout flashing should be installed at the base of sidewalls where the sidewall extends past the roof termination.
- Boot or collar flashing should be installed at HVAC combustion, dryer, attic, and plumbing vents to prevent roof leaks.
- Corrosion-resistant flashing pieces should be installed in an overlapped shingle fashion.
- Step flashing should be extended at least 4 inches up the wall from the roof deck and at least 4 inches out along the roof deck.
- Step flashing should be integrated with the drainage plane above (for example, overlap housewrap over it).
- Step flashing, if made of metal, should be galvanized steel.
- Roof felt should be installed prior to installing the step and kickout flashing.
- House siding should be installed over the step flashing, ending at least 1 inch above the roof surface.
- Roof shingles should be installed over the portion of step flashing on the roof.
- If the roof is metal or rubber membrane, continuous flashing should be used, rather than pieces of step flashing.
- Kickout flashing should be installed at the end of a roof-wall intersection to divert water away from the wall and into gutters.
- The kickout flashing should be large enough to handle expected stormwater flows.
Sidewall Step and Kickout Diverter Flashing Installation with Rigid Foam Insulation SheathingHere is a step-by-step procedure on how sidewall step and kickout diverter flashing should be installed on houses with rigid foam insulation. Knowing how components are properly installed can help home inspectors conduct better inspections.
To be effective, kickout flashing has to be layered with the framing, weather-resistive barrier (WRB), trim, roofing, and siding properly so that it prevents water from entering the wall assembly and diverts the water away. The following pictures are from the U.S. Department of Energy’s Building America Best Practices Series, Volume 11.

The image above shows that the drip edge and roof underlayment should be applied over the roof deck and continue lapping up the sidewall and over the water-resistive barrier (in this case, rigid foam insulation) a minimum of 7 inches.
From the image above, the shingle starter strip should be installed at the roof eave in accordance with the roofing manufacturer’s instructions.
A seamless, one-piece, non-corrosive kickout diverter should be positioned and installed as the first piece of step flashing. The kickout diverter should be positioned on the roof plane where the starter trough stops at the shingle starter strip. The diverter must be flat on the roof and flush to the sidewall. The diverter should be fastened and sealed to the roof deck and starter strip.
The image above shows that the first row of shingles and next section of sidewall flashing should be installed over the up-slope edge of the diverter, lapping a minimum of 4 inches over the diverter. The sidewall flashing height requirement should be determined by a design professional and local building codes.
The image above shows the remaining sidewall flashing, appropriate counter flashing, and shingles should be installed in accordance with the manufacturer’s instructions.
The picture above shows that the self-adhesive flashing should be applied over the top edge of the wall flashing, diverter, and rigid foam insulation.
Construction tape should be applied over the self-adhered flashing, The siding should be installed over the rigid foam insulation.Sidewall Step and Kickout Diverter Flashing Installation with Wood Sheathing
Here is a step-by-step procedure on how sidewall step and kickout diverter flashing should be installed on houses with housewrap over oriented strand board (OSB) or plywood sheathing.

The drip edge and roof underlayment should be applied over the roof deck. The underlayment should continue lapping up the sidewall and over the weather-resistive barrier (in this case, housewrap) a minimum of 6 inches.
The shingle starter strip should be installed at the roof eave in accordance with the roofing manufacturer’s instructions.The seamless one-piece non-corrosive kickout diverter should be positioned and installed as the first piece of step flashing. The kickout diverter should be positioned where the starter trough stops at the shingle starter strip. The diverter must be flat on the roof and flush to the sidewall. The diverter should be fastened and sealed to the roof deck and starter strip.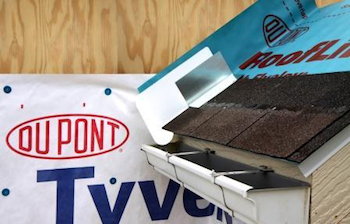
The first shingle and next section of sidewall flashing should be installed over the up-slope edge of the diverter, lapping a minimum of 4 inches over the diverter. The sidewall flashing height requirement should be determined by a design professional and local building codes.
The remaining sidewall flashing, appropriate counter flashing, and shingles should be installed in accordance with the manufacturer’s instructions.
Self-adhesive flashing should be applied over the top edge of the wall flashing, diverter, and housewrap.
The housewrap should be installed to fit over the self-adhesive flashing and sidewall flashing. The housewrap should be cut to fit over the diverter with the top of the cut taped, and the siding should be installed over the housewrap.
Kickout flashing inspection image was taken at the InterNACHI House of Horrors. This is a properly installed kickout flashing with moisture-drainage EIFS.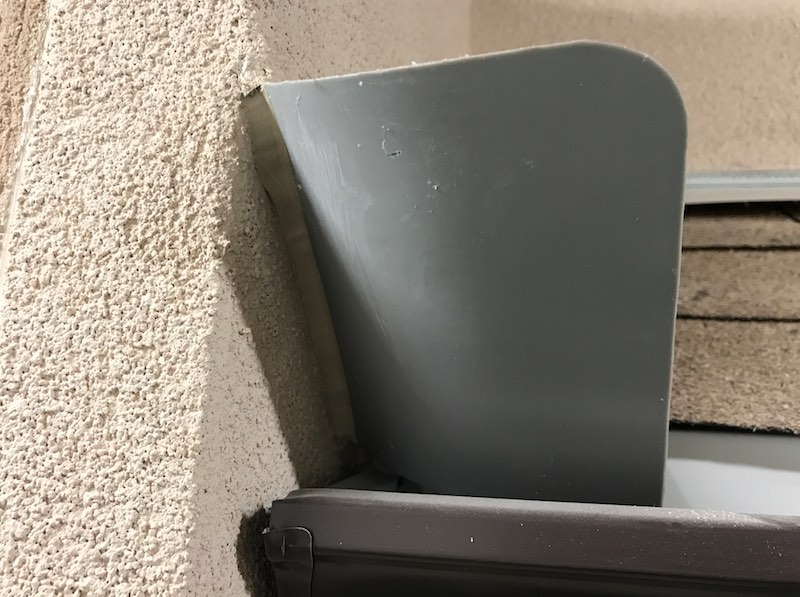
Kickout flashing inspection image was taken at the InterNACHI House of Horrors. This is a properly installed kickout flashing with moisture-drainage EIFS.
Summary
Where roofs intersect walls is a critical point for flashing to be installed in order to prevent water leaks and damage. While wood siding may show evidence of this water intrusion, with peeling paint or staining, some wall claddings, such as fiber cement, vinyl siding, and brick veneer, can mask the evidence for years. Flashing and diverters must be correctly integrated with housewrap, cladding, and gutters to prevent water damage. Home inspectors may check for step flashing and roof-wall water deflectors that help drain water away from high-risk corners where walls meet roofs.This article was sourced primarily from the U.S. Department of Energy and InterNACHI®.- ICC-Certified Contractor & Building Inspector Resources
Take InterNACHI's free, online "How to Perform Roof Inspections Course."